
How to Make Winding Sticks


Winding sticks are the tools that usually the first to touch the lumber. They can tell you if there is a bow, cup twist, or other imperfection that should be removed in the milling of the board. They have been in use for thousands of years and are still a hand tool that should be in every woodshop. On top of that, they are often the first tool that hand tool woodworkers will make for the woodshop. They can teach several key skills that should be mastered early. If you want to see how to use them or see far more detail on how to make them and the skills involved, above is the long format video for that.
Tools Needed
#4 Hand plane setup for smoothing: http://amzn.to/2hc6LQZ
Square: http://amzn.to/2ia9M3Z
Marking Gauge: http://amzn.to/2i0jvHx
Panel saw: http://amzn.to/2hjAura
Marking knife: http://amzn.to/2hPHf34
Brace: http://amzn.to/2hPEs9Y
Bit set: http://amzn.to/2hZVT5T
Chisel Set: http://amzn.to/2i26mzX
Block Plane: http://amzn.to/2ikkaqg
Rabbit Plane: http://amzn.to/2kEfRmO
Spring Clamps: http://amzn.to/2kEj8T1
Shooting board: https://www.youtube.com/watch?v=W7xD9fmbcdo
Flush Cut Saw: http://amzn.to/2jI0z05
Supplies needed
3'-4' of 3/4" X 1 1/2" stock (mine was hard maple)
Inlay material (whatever scrap you have on hand)
3/8" oak dowel: http://amzn.to/2kEj1GV
Boiled Linseed Oil: http://amzn.to/2hPEUVO
Paste Wax: http://amzn.to/2inlN23
Wood Glue: http://amzn.to/2kEeTHc
Choose Your Stock


Start by choosing your material. This can be almost anything you have laying around the shop. Mine was made out of hard maple beam 3/4" x 1 1/2" x 40" that beam should be cut in half to make two identical sticks. You will also need some inlay materials. I used ebony and box elder as they were laying around on the floor. The key is that one is darker than the other. Lastly, you will need a little bit of dowel stock. Mine are 3/8" oak, but again, whatever you have in the shop will work well.
Cut Rabbit For Inlay


This is the easy method of inlay and you could do this for both the light and dark wood, but I will also show you a second method for smaller pieces of scrap. For this, use a rabbiting plane or combination plane to cut a rabbit along one corner of the stock beam. It should not be as deep or wide as the stick you wish to inlay so that it can be planed back to flush with the stock face. The stock can then just be glued into the rabbit. I just use some spring clamps to hold it in place as the glue dries.
Second Inlay Method

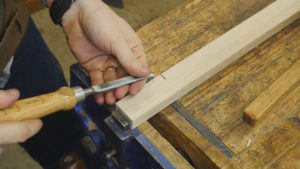


The second method of inlay is in a stopped rabbit. I start by using a square, marking knife, and marking gauge to layout the cut lines on 3 sides of the corner of the beam. This should be slightly smaller dimensions than the piece you want to inlay. When the piece is glued in, it can later be trimmed back to flush with the beam. With a chisel and mallet, start by making a stop cut at the stopped end of the rabbit. Take care to stay away from the marking line. This can be cleaned up later. Then, use a chisel to slowly remove the waste from one end to the other. When you get close you can test the piece in the rabbit. Slowly work all the way up to the marking lines until you get a nice tight fit with the inlay. Lastly, glue it in and secure with blue tape or spring clamps.
Flush Up Inlay


Once the glue is dried, it is time to flush up the inlays. Use a finely set plane to trim up the two faces to be smooth with the beam. Using a shooting board will make quick work of the ends of the stock.
Add Dowel Pin


Now you want to drill a hole in the middle, end to end of both boards so you can easily center the stock on the work. The oak dowel can then be inserted into the hole and cut flush cut saw. If the fit is tight it might not even need glue, but a bit of super glue may be the best fix here if it is a bit loose.
Make Parallel

This is the only important step of the whole project. I start by smoothing and flattening the front, back, and bottom. The last thing it to make the two sticks exactly the same height. I do this by clamping them side by side on a flat surface. This way when they are planed together the plane will make them perfectly parallel.
Finish It


As with all my hand tools, I love a BLO and paste wax finish. It just feels good in the hand. I apply the BLO until it soaks in, usually 2 applications with 15 minutes in between. Then, I rub in some past wax and let it sit for 20 minutes or so. Lastly, I use a rag to buff the wax and then let them sit over night. After letting it dry, they are ready to use.