
Curved Seat for Photographers
https://www.youtube.com/watch?v=eR7TBBXQCcM
A photographer friend of mine asked me to make one of these for her photo studio. It is a bit different from what I normally like to do, and as much as I dislike panted finishes, I am not a man to turn away a challenge. I learned a few things along the way and hope to share those with you here.
Tools
Long Nosed Marker: http://amzn.to/2lExV1e
Coping Saw: http://amzn.to/2kCe68X You could also use a turning saw or jig saw
Panel Saw: http://amzn.to/2hjAura
F-Clamp http://amzn.to/2nrdEzs
Brace: http://amzn.to/2hPEs9Y
Bit Set: http://amzn.to/2hZVT5T
#4 Hand Plane: http://amzn.to/2hc6LQZ
Block Plane: http://amzn.to/2ikkaqg
Flat Spokeshave: http://amzn.to/2lKn6ND
File Set: http://amzn.to/2l0czdB
Paint Brush: http://amzn.to/2nnsGpA
Pull Saw: http://amzn.to/2n4EMRL
Compass Pencil: http://amzn.to/2n4FgYq
Supplies
1 x 12 x 4' Pine (1): http://amzn.to/2n2xGg1
1 x 2 x 4' Pine(2): http://amzn.to/2nzgiDo
2 x 2 x 8' Pine stud grade (2)
Flexible Plywood: http://amzn.to/2nhTFkQ
Wood Glue: http://amzn.to/2kEeTHc
Wood Filler: http://amzn.to/2ohjyAi
Paint: http://amzn.to/2n2uUaI
Shape the Bananas


I start by making a template out of scrap cardboard. There is no hard and fast design to this, I just drew something I liked with the seat 12" off the ground. That seemed good for the kids. The circle has about a 24" diameter on the outside and the ring is 1.5" thick.
I use a marker to trace out the template onto the piece of clear 1x12 pine.
Next use a coping saw or jig saw to cut out the shape. You will need 2 of these curves (bananas).
Make Legs


I wanted the legs to be 1.5" square, so rather than cutting them out of 2 x 2s, I decided to laminate them so there would be a half lap joint at the top where it meets the bananas.
I cut 4 pieces at 11" and 4 at 12.5" then glued them up in pairs.
Glue up Assembly


It is important that the front and back match, so when I glue the legs to the bananas, I want them to be perfectly lined up.
To do this, I clamp the two bananas together. Then, I clamp two pairs of legs together so the half lap joints face each other.
With these in place, I can add glue and slide the leg pairs on to the bananas and add clamps.
This way when I take the clamps off I am left with a matching front and back shape of the seat.
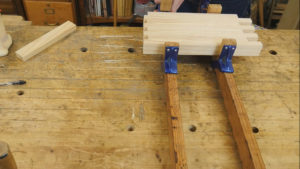
Attach Supports


Next, we need to separate the front and back. This will be done with 2x2s that are the same thickness as the bananas. I place them every 4-6" spanning between the two frames.
Start by cutting all of the spacers at 10.5". Then pre-drill and countersink all the screw holes in the bananas. We do not want them splitting.
Then with 2 1/2" screws and glue attach the spacers so they are flush with the bottom and top of the seat.
For the last two, on either side of the seat, I used 2x4s, but you could also use 2x2s there too. Just make sure it is flush with the bottom and top and sticks out on the end of the banana seat.
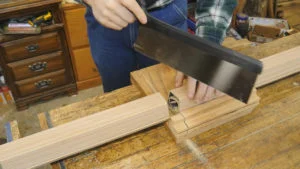
Trim off End Supports


You will want to trim the last space back to be flush with the bottom top and outside edge of the banana.
I did this with a panel saw and hand plane. It made quick work of smoothing it out.
Face Seat

I decided to use this roll wood used for facing columns in the basement. I got it at the local home center, but if I had to do it again I would use 2 layers of 1/8" ply wood like I have listed in the supplies.
With a flexible tape measure, measure the width and length of the seat. Then, cut it to dimension. I decided to make mine about 1/2" larger in both directions so I could cut off the excess.
To attach it down, I just used wood glue and clamps to hold it in place. You could also use brad nails.
After letting the glue dry overnight, I trimmed off the excess with a pull saw or flush cut saw.
Trim Off and Fill Edges

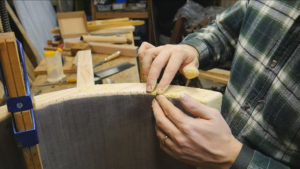

Now it is time to smooth out all the edges. I used a spoke shave to round over all the edges and give it a smooth look.
Then I used wood filler to fill all the cracks, voids, and screw heads and after it dried I sanded off the wood filler with a file.
Paint and Refill

This is the step that does not end. I applied a thin first coat of primer, but this shows off all the imperfections.
Once that coat dries, you can add more wood filler.
Then let that dry and sand it again and paint again. I did this 3 times until I was satisfied with the look.
Trim Legs

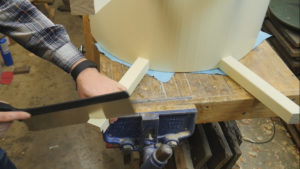

I had left the legs long until now to let any wood movement have its way.
I set the bench flat on a table and put a spacer under the one leg that wobbled until the bench was flat.
With a pencil compass, I marked all around each leg with a line that is parallel to the surface.
With a hand saw I can then cut the legs off at that line. Lastly, I want to add a chamfer to all the bottoms so that they will not chip out when moved across the floor.
Final Paint

At this point, it just needs a final paint. Take your time and make it look nice.
It is not a difficult project if broken down into steps and taken one section at a time.