
How to Carve Clogs
I love clogs as shop shoes. They are comfortable, safe, and easy to slip on and off. A while ago, I was given these traditional wooden Dutch clogs from Rob and I have been wearing them as shop shoes for several months. It was time to carve them and have some fun. Many would call them wedding clogs when you decoratively carve them. These have chip carving, Celtic rope and weave carving, and a bit of my own flair.
I do not want to show a particular design or look to follow as every pair should be different and express your own style. You will have to express a bit of your own imagination and creativity to come up with your own design, but that is not as difficult as it looks. With a quick google search, you will have more ideas and examples then you could ever use. Don't be afraid to express yourself and have a bit of fun. And I can assure you this is a lot easier than it looks!
Tools needed
Carving Chisel Set: http://amzn.to/2kf8Wjb
Carving Knife: http://amzn.to/2kNqwvI
V-Tool: http://amzn.to/2kf8OjO
Compass: http://amzn.to/2mQy7LF
Wooden Clogs: http://amzn.to/2mDq6N5
Glue Stick: http://amzn.to/2lGFnuF
Card Scraper: http://amzn.to/2lGyFF0
Shellac: http://amzn.to/2m5wedV
Chip Brush: http://amzn.to/2m7suKC
Draw out the Design


This is one of the most difficult parts in that you have to express your own imagination and try new things. Use a pencil to start outlining what you want. This way if you do not like it you can easily remove it and draw new lines. I started by using my finger to slide along the rim of the opening and draw a line in about 1/2" all the way along. I then used a compass to draw a few circles where I thought they wold look good. For any straight lines, I used a piece of an old belt sander belt as it was still enough for a straight edge and flexible enough to fit the bends of the shoe. I drew geometric patterns on and around the two side circles. these would be small triangles that could be chipped out. I just kept drawing tell I thought it looked good always embracing what I did like and adding more. don't be afraid to experiment!
Different Tools You Can Use


Part of learning carving is learning what tools you want to use. There is no "correct" tool there is only the best tool for you, and you will never find that until you try them. I used a straight bench chisel, carving knife, a v-chisel, and a skew chisel for most all of this carving. I would suggest playing around with them and finding what you like.
Chip Carving


Most of the main body was chip carved. This is the traditional way to carve wedding clogs. Also, traditionally it was done with a simple knife, but I found I preferred to use a skew chisel for most of it. With a triangle or any geometric shape you can cut in along the line at an angle toward the middle of the shape, then cut in from a line on the other side and connect the two cuts below so that a chip comes out. Most of my cuts were at about a 20-degree angle into the wood, but that changed for different shapes.
Pattern Carving

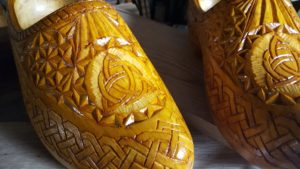
For the large front circle, I wanted a Celtic trinity so I printed out one I found on Google images and sized it with paint to fit the size I drew. Next, I place masking tape then applied the design to the masking tape with a glue stick. This way it will easily come free when I am done carving. with a v-chisel I follow the lines of the pattern. This is surprisingly easy and with 10-15 minutes of work, you can master this method. Once the carving is done, you can just peel back the masking tape to remove the pattern.
Patterns on Curved Surfaces


Next, I wanted a Celtic weave all the way around the bottom. The problem is it is so curved that paper will not easily conform to it. So after printing out the weave, I wanted I cut the pattern with a bunch of slits at each knot in the design. This will allow it to bend around the shoe. In this case, rather then putting down masking tape, I decided to just glue it to the surface. This is a bit more difficult to remove, but not that difficult. Just like the last carving, I used a v-tool to trace the pattern and carve the design. Once you are done you can remove the pattern with a card scraper. This also starts the finishing of the wood!
Rope Carving

Around the opening, I wanted a bit of rope carving. This I decided to hand draw the design, and on the second shoe was confident enough to just free carve it without any lines to follow. To draw the pattern make lines at 45 degrees spaced about 1/4" apart then turn those lines into S's that connect with the line in back and in front. Lastly, just follow those lines with the V-Tool just like you did before.
Final Details


At this point, I took a step back and decided to fill in some of the missing spots with some more detail. I put a small groove around the edge of the shoe opening and added small gouge marks flaring out from the Celtic trinity. Let your imagination run wild and have fun with it!
FINISH IT!!!!


I lightly sanded the surface with 220 grit to remove any chips or roughness in the outside face. It is important to only do this when you know you are done. You do not want to dull your chisels on grit left behind from the sand paper. For a finish, I used 2lb cut of shellac applied with a chip brush. In between coats 2 and 3, I lightly sand with 400 grit, then sand it again between coats 4 and the final. For most, 5 coats will be enough to get the look you are wanting. And there you have them; shop shoes all set for a fun dance!