
How To Make A Shooting Board
https://www.youtube.com/watch?v=W7xD9fmbcdo
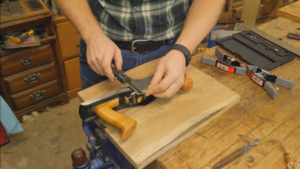
The shooting board is a tool that disappeared when hand planes stopped being used by most woodworkers. However, with the return of hand tools to the average shop, this gem of old world woodworking is coming back too. A shooting board allows you to trim down the end of a piece of stock quickly and easily; giving you an end that is perfectly plumb and square as well as smooth and good looking without forcing sawdust into the pores.
Tools needed
Hand router: http://amzn.to/2j8GeEa
#4 Hand plane setup for smoothing: http://amzn.to/2hc6LQZ
Low Angle Jack Plane: http://amzn.to/2jjxFXb
Panel saw: http://amzn.to/2hjAura
Supplies needed
White Oak or whatever wood you prefer: from the scrap pile in the garage.
Boiled Linseed Oil: http://amzn.to/2hPEUVO
Past Wax: http://amzn.to/2inlN23
Wood Glue: http://amzn.to/2jjy3Vv
Assemble the Base


You may be able to make a base out of a single piece of wood or as I did join together two pieces to make a solid sheet 3/4" thick, 18" long, and 14" wide. This size can change to whatever you need or want, but those are the dimensions of what I made.
Layout for Groove

I start by marking a line from top to bottom in about 3" from one side. If you are right-handed that will be in from the right side, and in from the left if you are left-handed. Next, I measure the height of the side wall of the plane I want to use for the shooting board. Last, I draw a second line parallel to the first that same measurement away from the first line. This will be the two walls of a groove that capture the side wall of the plane as it slides.
Cut Out Groove


Next, I use a router plane to slowly remove the waist between the two lines. I take it down a step at a time until it is down to the max depth I want. That depth will be slightly more than the distance from the side wall of the plane to the side of the iron. This way when the plane is in the groove the edge of the iron will be slightly below the deck of the shooting board.
Cut and Attach a Stop


The height stop should be slightly less than the width of the iron and should be as long as the distance from the groove the the opposite side. Some people like to screw this in place so it can be changed in the future and some, like me, like to glue the stop in place. It is important that the stop be both square to the groove and the deck so before the glue sets, check it with a square and adjust as needed. I like to clamp mine in a vice and tap it into the perfect place with a mallet, then leave it in the vice overnight.
Attach Bench Hook

You will want to glue a strip along the front under the deck of the board so that it can hook on the front of the bench. This piece does not need to be more than 3/4" x 3/4" and glued in place.
Chamfer and Finish


I like to give all outside corners a bit of a chamfer just to make them look and feel good. Then finish it with boiled linseed oil and paste wax. You will want to make sure there is enough wax in the groove so the plane slides easily in it.
And there you go! An easy project that will serve you well for years to come.