
How to Make A Leg Vise


It was about time I made a decent leg vise and this is how I did it. The chop is made from a slab of Cherry, the wooden screw is made of hard Maple from Acer-Ferrous. it has bowties and Celtic carving throughout and a brass retention ring to top it all off.
Tools Needed
Panel saw: http://amzn.to/2hjAura
#4 Hand plane setup for smoothing: http://amzn.to/2hc6LQZ
V-tool: http://amzn.to/2iNSdEn
Brace: http://amzn.to/2hPEs9Y
Bit set: http://amzn.to/2hZVT5T
Chisel Set: http://amzn.to/2i26mzX
Carving Mallet: http://amzn.to/2iT4FoO
Marking knife: http://amzn.to/2hPHf34
Hole Saw Set: http://amzn.to/2jz6ULX
Supplies
Wood Slab for Chop
Wood Screw and nut: http://redrosereproductions.com/acer-ferrous-toolworks/
1" Oak Dowel: http://amzn.to/2iVjDqs
Brass Bar: http://amzn.to/2jIYQut
1 x 4 (whatever wood you want) http://amzn.to/2kcfYtp
Leather: http://amzn.to/2kch0pb
Boiled Linseed Oil: http://amzn.to/2hPEUVO
Paste Wax: http://amzn.to/2inlN23
DAP Contact adhesive: http://amzn.to/2jJWMCG
Choosing the Chop


The chop is the jaw of the vice that will clamp the work to the bench leg. You want something thick enough that it will not deflect, long enough that you can use a lot of leverage on it, and wide enough to clamp larger pieces. For hardwoods you want at least 1.5" thick and for soft woods I would not go less than 2.5". Make it as long as your bench top to a few inches off the ground. In my case I am using a slab of Cherry 2.5" thick, 14" wide, and 31" long.
Flatten The Chop


I start by flattening the front face of the chop. This can be a detailed job and I do not want this post to go that long so here is more information on flattening a board. https://www.youtube.com/watch?v=s9O0tXjKU9Y After the front has been flattened, I flip it over and flatten the back. It is very important the face be perfectly flat that way it will mate nicely with the leg and face of the bench giving nice even clamping pressure.
Shape the Chop


The shape can be anything you want it, so here you can get a bit creative. Normally the chop narrows as it gets to the bottom and is its widest where it mates with the face of the bench giving a wide a clamping surface as it can. In my case, I wanted to keep the live edge at the top, it narrows down to 4" at the bottom along the taper I put in a large camphor just for looks.
Add A Bowtie (Optional)

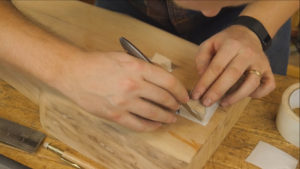


In my case, I had a shallow crack in the face of the chop. This is common on thicker slabs so I thought it would be a perfect opportunity to install a bow-tie. I start by drawing the shape of a bow-tie on a scrap of hard maple, this can be almost any shape you want. With a marking knife and some carpet tape, I mark out the shape on the slab. Then I use a brace and bit and chisel to remove the waste. Next, glue it in place. When dry, plane it close to flat and use a card scraper to clean the surface.
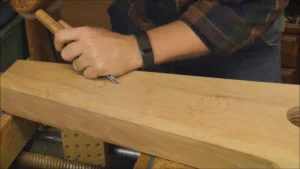
Install the Screw


I got my screw from Acer Ferrous Toolworks. It is a beautiful 2 1/2" wood screw that will provide more force than you could ever put into it. To drill a hole through the chop into the leg I start by clamping the chop in place then mark out where the hole should me. I use a 2 1/2" auger bit to drill the hole but you could easily use a hole saw. Once the bit makes its way through the chop I remove the chop and continue through the leg. Then I can mount the nut on the back of the leg with 4 screws. This way the screw can go through the chop and leg and secure itself in the nut on the back of the leg.
Make a Crossbar Cap


For the cross bar that goes through the thread of the screw, I used a 1" oak dowel 15" long. you could just put a screw through the dowel to keep it from slipping out but where is the style in that? I decided to make octagon shaped end caps. I started by cutting a blank of oak 3" long and 1 1/2" square. I chamfered the corners so that it then became an octagon. Then, I drilled a 1" hole in both ends that went in 1". I could then cut it in half and would have two end caps. the lead screw from the auger bit would also create a small hole in the end so I could secure it to the end of the bar with a screw.
Make a Spreader Bar


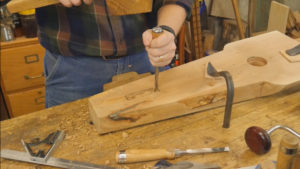
The spreader bar is nothing more than a 1 x 4 of whatever would you would want. It has holes all throughout it at 1/4" increments so you can stick a key through it and support it against the leg. Next, it is placed near the end of the leg. I use a marking knife to mark out where it will go then cut out a mortise to fit the bar. This only goes half the way through the chop. Next, those marks are transferred to the bench leg and a through mortise needs to go through the leg for the spreader bar to go through. This hole can be much larger than the bar as it will need to easily slide through. If the fit is tight in the chop I do not glue it in, compression will hold it in place and you may want to remove it in the future.
Make it Pretty!

A project like this jumps to an 11 when you add a bit of carving. I know a lot of people think this is way too complicated but most everyone can pick this up in 5 to 15 minutes. With a good V-Tool carving tool this is so fast. I did all the carving on this leg in about 10 minutes. Give it a try, I promise you will not be disappointed.
Add Leather to the Chop


I put a strip of leather on the chop side of the clamp to increase friction in the clamp. With some DAP contact adhesive or barge it will stay there for a lifetime. I clamp it in place overnight just to make sure the glue is fully cured.
Finish IT

I use boiled linseed oil and paste wax for mine but you can use whatever finish you are comfortable with. I put a lot of extra wax on the threads of the screw and nut so it will run easily. This is the fun part when it comes to life.
Make a Retention Ring


I used brass to fit into the retention slot on the screw. The brass I used was 3/8" by 2" by 4". With two pieces this size I put them side by side and had a 4" square. This square was clamped to the bench so the holes can be drilled. I started by drilling a plate hole in the middle of the square, then used a 2" hole saw to cut a large hole in the middle of the square cutting a half circle out of each plate. Next, I drilled a hole in each of the 4 corners of the square for the mounting screws to be placed. This ring can then go around the screw so it can be secured to the chop.
Assemble

Next put it in place and play with it! Hand tool woodworking just became that much easier!
[activecampaign form=1]